

Wood Worktop Stripping: Solving Sticky, Gummy & Tacky Danish Oil Buildup
Fixing the Mess of Failed, Sticky DIY Finishes
If your wooden kitchen worktops have become uncomfortably sticky, gummy, or tacky to the touch, you are dealing with a very common and incredibly frustrating issue. Instead of a smooth, clean surface, your worktops are likely catching dust, lint, and hairs, and the finish might even feel like it is melting under your hands in high-traffic zones.
This tacky residue happens when traditional coatings—most commonly retail-grade Danish oil, linseed oil, or clear varnishes—fail to dry properly. When an oil finish cannot cure, it leaves behind a soft, polymeric layer that sits on top of the timber rather than protecting it from within.
Attempting to fix this by running a standard DIY power sander directly over the work surface is a recipe for disaster. The friction heat from the sander will instantly melt the soft, gummy residue, completely clogging the sandpaper within seconds, smearing the mess deeper into the clean wood grain, and ruining your sanding discs.
With 20 years of specialized timber restoration experience, we use heavy-duty mechanical scraping techniques to cleanly slice away this failed, sticky boundary layer down to the bare timber before executing a flawless, dust-free re-sand and seal.
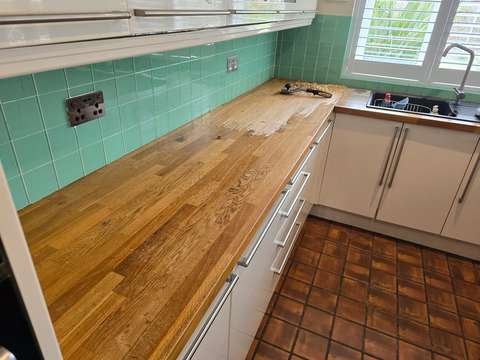
We used a Purdy scraper to remove the thick sticky danish oil coating from the surface.
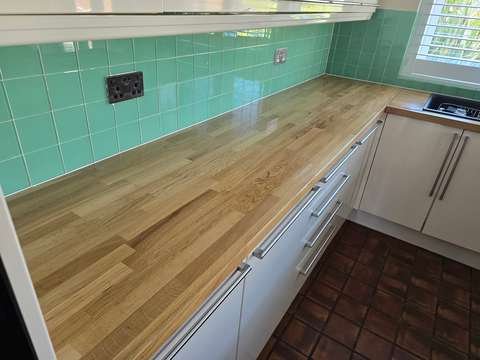
This is the worktop after we removed the layers of old danish oil and applied a fresh coat of hard wax oil.
Why Do Wooden Worktops Become Tacky?
A sticky wood surface is almost always caused by a chemical failure during the oiling process. This typically happens for three reasons:
Over-Application & Hardened Skins: Traditional hardware store oils require you to wipe away any excess liquid 15 to 20 minutes after application. If the excess oil is left to sit on top of the timber, it forms a thick, soft, plastic like layer that can take months to dry—or may never cure at all.
Oiling Over Hidden Kitchen Grease: If a worktop isn't deeply degreased before a fresh coat of DIY oil is applied, the built-up kitchen grease and oils block the fresh finish from reaching the raw wood pores. The chemical dryers evaporate into the air, leaving a permanent gummy residue trapped on top of the fat layer.
Expired or Outdated Oils: Traditional wood oils rely on metallic chemical dryers to cure. If a tin of oil has been sitting in a shed or cupboard for years, those dryers break down. When applied to a worktop, the oil will remain a soft, gum like gel permanently.
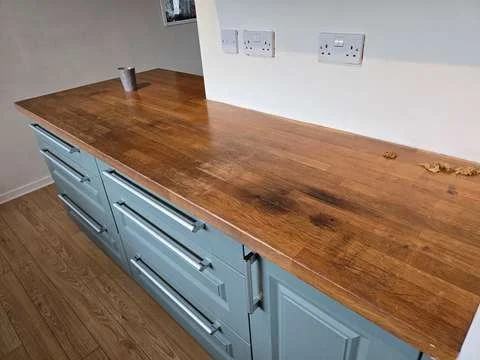
Another very sticky and shiny worktop From old worktop oil. You can see the shavings from the scraper on the right of the image.
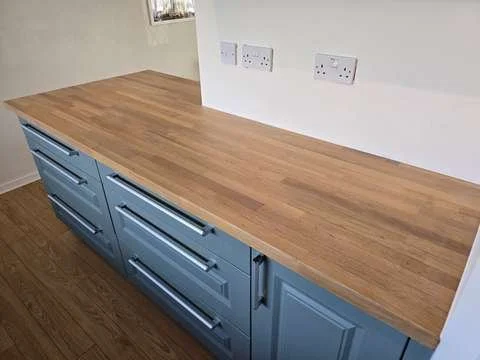
The worktop has been beautifully finished in our preffered coating fiddes matt hard wax oil and is completely tack free.
Our Step-by-Step Sticky Oil Removal Process
To safely strip away a failed finish without tearing up the wood fibers or making an absolute mess of your kitchen, we follow a strict trade sequence:
Step 1: Heavy-Duty Mechanical Scraping
Because power sanders cannot handle soft, gummy finishes without melting them into a bigger mess, we must remove the bulk of the residue entirely by hand using specialized trade tools.
We use a heavy-duty, dual-grip Purdy 2.5-Inch 4-Edge Scraper combined with a Hamilton Perfection Precision Paint Scraper for intricate edges and machined draining grooves. Using absolute precision, we cleanly slice and shave the soft, rubbery oil buildup right off the worktop, cutting straight through the gummy mess until we strike the solid, bare timber beneath.
Step 2: Solvent Stripping & Deep Degreasing
Once the physical buildup has been scraped away, a microscopic film of failed oil and kitchen grease will still be clinging inside the open grain lines.
We wash the raw timber down with specialized, heavy-duty trade solvents. This process dissolves the remaining residues, pulls out trapped cooking fats from the wood pores, and leaves the timber completely dry, crisp, and ready for clean mechanical sanding.
Step 3: Dustless Progressive Sanding
With the sticky residue completely gone and the timber fully dried out, we can safely bring in our advanced machinery without the risk of clogging or smearing.
We use our industry-leading Mirka DEROS random orbital sander connected directly to our M-Class dust extraction system. We run through a progressive sequence of grit sequences, finishing precisely with Mirka Abranet 120-grit ceramic mesh discs. This removes any minor surface tracking left by the hand scrapers and leaves the timber factory-smooth without burnishing the wood fibers.
Step 4: Applying a True Trade-Grade Hardwax Finish
To replace the failed DIY finish, we apply multiple coats of premium Fiddes Hardwax Oil using no loss, synthetic brushes.
Unlike traditional Danish or linseed oils that form a thick, vulnerable skin on top of the wood, our trade hardwax oil penetrates deep into the raw grain, bonding at a molecular level with the timber cells. It cures fully within 24 hours to form a completely dry, water-repellent, antimicrobial barrier that will never turn sticky, gummy, or tacky.
An Honest Note on Expectations from a Master Craftsman
When a worktop has been covered in a failed oil finish for a long time, it acts like a magnet for dirt, grease, and moisture. In many cases, water from the sink area gets trapped beneath the unhardened oil layer, causing hidden black tannin stains or minor rot to develop in the timber over time.
Serving Surrey, Hants and Berks, our specialized scraping and solvent-stripping process is guaranteed to entirely remove the gummy residue and bring your surfaces back to bare wood. During the process we often discover hidden water damage or staining underneath that requires extra targeted treatments (like oxalic acid neutralization). This is why we always perform a thorough inspection of the bare wood during the scraping phase to ensure every single defect is handled before we lock in your fresh, durable finish.
Frequently Asked Questions
Can I use white spirit or wire wool to scrub away the sticky oil myself?
It is an incredibly messy, exhausting task that rarely works. Rubbing white spirit into a thick putty like finish with wire wool or rags just turns the cured oil into a soft, slippery paste. It tends to push the sticky residue deeper into the open grain of the wood, making it even harder to remove properly and often resulting in a permanently patchy surface.
Will the scraping process gouge or damage the wood?
Not when executed by a professional. Using heavy-duty, ultra-sharp carbide scrapers requires a highly trained, level hand. We know exactly how much tension to apply to cleanly shave away the failed chemical finish without digging into or gouging the natural run of the timber.
How do I make sure my worktops never go sticky again?
By switching to a modern hardwax oil system. Once we apply Fiddes Hardwax Oil, the finish cures to a hard, dry, resilient defense. For your daily routine, you simply use a pH-neutral wood worktop cleaner spray (such as Fiddes or Osmo) which gently cleans the surface without leaving a soft, greasy buildup behind.
Need Failed, Sticky Finishes Safely Stripped and Restored?
We provide professional mechanical hand scraping, deep solvent degreasing, and dustless hardwax oil restoration to rescue sticky, gummy kitchen work surfaces.
Learn more about our local regional coverage on our main [Surrey Worktop Restoration Services] hub.
Explore our full range of surface fixes on our main [Wood Worktop Sanding & Restoration] service page.